Building a new website can be a harrowing experience for people who don’t have any expertise coding. WordPress creates an easier experience in building a website for beginners. The platform has taken difficult tasks like creating a page and making it just as easy as it sounds. I will be covering accessing and understanding your Admin portal, setting up your site, and a few basic functions in order to make your experience using WordPress as painless as possible!
Accessing Your WordPress Admin Portal
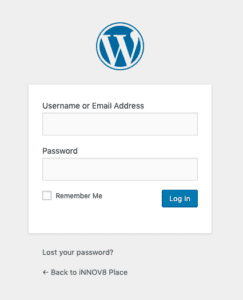
For starters, logging into your WordPress administrator portal is incredibly easy! Just by adding “/wp-admin/” to the end of your URL in the address bar you’ll be able to log in.
From there, you’ll be taken to a login portal that looks a lot like this:
Welcome to Your WordPress Dashboard
Once logged in to your WP account, you’ll be brought to your dashboard. This is where the real fun begins. In the WordPress admin portal, you’ll find ways to add content to your site, customize how your website looks, and add plugins to further add functionality. I’ve included an example below:
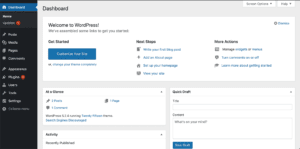
There are a few spots on the dashboard that should be addressed. First is, of course, the “Welcome” window. When first starting out, this window will suggest different steps you can take to continue building up your site. I suggest taking a look at these options if you find you are at a standstill.
The “At a Glance” window gives you simple stats related to your website such as the number of webpages you have or how many comments are on your blogs. It will also list your current WordPress theme and what version of WordPress you are using.
Your “Activity” is basically any recent activity on your site. This can cover published posts, scheduled posts, and any incoming comments. This feature also gives you the ability to manage these things at a smaller scale from the dash.
Now, “Quick Draft” is a great tool, in my opinion. You have a blog idea and you just want to start writing it down. You also have your WP dash open… so why not just title it whatever, and then get to writing? Quick Draft will only ever save drafts, so you can mess around with this without fear of something incomplete getting posted.
The WordPress dashboard also has a space for any news and events so you can stay up to date with any changes or updates! This is good for anyone that wants to get more involved with the WordPress community but doesn’t exactly know where to start.
The “Updates” selection under the “Dashboard -> Home” will take you to the update hub. There you’ll be able to see what, if anything, needs to be updated. This covers your WordPress client, the plugins you choose to add to the site, and any theme updates. You’ll usually know something is up because there are red dots with a number inside to indicate how many updates are needed.
Learning the WordPress Admin Portal
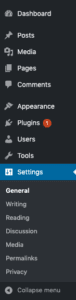
Alright, so you want to add some stuff to your site. Before we do that, let me first direct your attention to the sidebar of your WordPress admin portal. Learning your tools will make it easier to use them as you begin to build up your site.
As you can see, there are several selections and some angry red update dots. Everything is fairly self-explanatory. You’d go to “Posts” to create or manage any blog posts. “Media” contains the library of photos, videos, and documents that you’ve uploaded to your site. “Pages” is where you’ll manage all the pages for your website. The “Comments” selection will take you to a screen dedicated to curating the comments left on your blogs if you so choose to allow them.
You would go to the “Plugins” tab to look at your plugins in-depth. You can also update your plugins from this screen. The “Users” screen allows you to add or remove other administrators or users. “Tools” is home to the “Categories and Tags Converter”, and whatever other tools you may download via plugins. And last but not least, we have “Settings”. This window will allow you to set your site’s title, tagline, URL, and other options.
Content, Content, Content
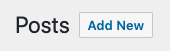
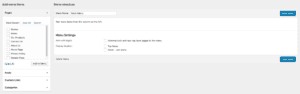
Alright, now that you have your site looking pretty, it’s definitely looking pretty empty, and you’re ready to change that. Let’s add a page to your site. If you go to the “Pages” option of your WordPress portal, you’ll see a button by the title that says “Add New”. This button is about to look really familiar to you as you begin to go through the motions of building the site.
![]()
Once you begin a new page, you’ll be prompted for a page title and will be given a text box that will be the content on that page. You can add text, photos, videos, or whatever you like to your site. Pages are different from posts in that they are typically static and will appear in your site navigation.
Above all, WordPress is a blogging platform. The portal makes it easy for you to use and update a blog on your site. As we’ve mentioned in the past, having a blog is beneficial for your site for many reasons other than SEO. To add a post to your site’s blog, you’ll go to your “Posts” section of the portal and click that beautiful “Add New” button at the top. Again, you’ll be redirected to a new post screen with a space to enter a blog title and the content of that blog.
Creating pages and posts are the number one way of adding content to your site. How you present the content is completely up to you. Keep in mind, whatever photos, videos, or media you upload through these posts and pages can all be found and edited in the media library we mentioned earlier.
Creating Menus
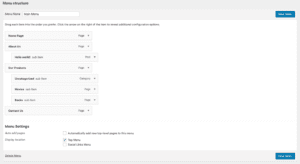
After adding content and pages you may need to set up your menus. If you hover over “Appearance”, it’ll give you several options. Right now, you’ll select “Menus”. Unlike the Pages and Posts, you won’t be able to press “Add New”. Under the section titled “Menu Structure”, you’ll see a text box labeled “Menu Name”. Simply name your menu (something like “Main Menu”) and then click “Create Menu”.
![]()
From here you’ll be able to create a customized menu for your site.
WordPress menus give you the ability to create submenus, add your posts, custom links (if you were wanting to link out to your Facebook or an outside page), and categories. I’ve built a menu to show how you may want a top menu to look. Rearranging the items you have added to your menu is as simple as dragging and dropping your menu items.
We’ve added some content in the form of pages and posts and then created a menu. Overall, in the most basic sense, your site should be ready for viewing. However, it’s time to take a quick look at the settings.
WordPress Settings Menu
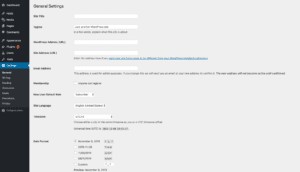
For the sake of this article, I’ll just go over the basics of the settings menu in the “General Settings” tab. Here, you can change the title of your website, the tagline, and your URL if you’ve bought one. The email address form is for the main administrator, so they will get any email updates from WP. If at some point you decide you want people to be able to subscribe as a member to your site, WordPress gives you the ability to do that simply by clicking a checkbox.
Other things you can change in the general settings are your time zone and how you would like the date and time format to appear on your site.
Summing Up WordPress
Take some time to really look around WordPress and better acquaint yourself with the many things you can do within the Portal. If it helps, there are also live demos available where you can mess around and not be afraid of ruining your site. Additionally, you can find a tab labeled “Help” on each page of the WordPress Admin portal, or use the extensive documentation provided by WordPress themselves.
If you still need help and just want to talk to a WordPress expert, please contact us for a free consultation! We’re happy to help you with any WordPress maintenance and issues you may encounter.